|
Introduction
W98
Upgrade
Guide
W98
Survival
Tips
Getting
on the
Internet
Mobile
Computing Tip
PC
Networking
Guide
Check
Your
W95 / W98
IQ
|
|
LB's
PC Bible Excerpts -2
|

|
|
|
Installing a Small Network

The trickiest
part of most network installations is the cabling. If you're networking
several PCs in the same room and you don't mind a few wires running
along the floor, go ahead and do it yourself. But if you need to run
cables through walls, or want to hide the wires for aesthetic reasons,
hire a professional. In that case, you might as well contract out
the whole cabling job.
While the other steps involved in setting up a network used to
be pretty challenging, Windows 95, 98, and NT 4.0 make it pretty
painless. The following guide will tell you just how to do it.
Warning: Do not attempt to follow these instructions on
a PC that's running any other operating system, like DOS or Windows
3.1.
Install
the Hardware
- Power down each PC, open it up, install an Ethernet adapter
in an available slot, and close up the PC. See "Installing Expansion
Cards" in Chapter 8: Upgrade It Yourself, for more detailed instructions
on that task.
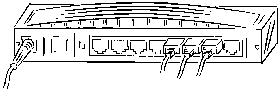
- Connect each PC to the Ethernet hub or ISDN router with Ethernet
cables (see Figure 3).
- Connect the hub's power supply and make sure that the power
is switched on. (The hub should have a "power-on" LED status indicator.)
- Switch the PCs back on.
In Windows 95/98, the operating system should detect
and configure the network card automatically. If you're prompted
to assign your computer to a workgroup, use the default name,
"workgroup."
In Windows NT 4.0, you'll have to set up the adapter
manually. Run the Network control panel, click the Adapters
tab, click Add, choose the card from the list, and click OK.
Follow any prompts to complete installation, then click OK to
close the Network control panel, and click Yes to reboot the
PC.
|
Figure 3
..............................
Connecting the hub. |
|
|
- After your network card is set up and the machine reboots, right-click
the Network Neighborhood icon on the desktop, choose Properties,
and click the Identification tab. Make sure the Workgroup is "workgroup,"
and that each PC has a different "Computer name."
|
Figure 4
..............................
Network identification. |

|
|
If Windows networking support is installed without a glitch, when
you power up your network, the hardware connection will be negotiated
automatically. Status LEDs on the network adapters and on the hub
will generally flash green to indicate a functional network connection.
Troubleshoot
Common Problems
If you see
green status lights on your hub, and the Network Neighborhood icon
is visible on the Windows desktop, you can skip this section of the
chapter and proceed to the next. Your network hardware is working.
The next section shows you how to confirm this by sharing a sample
file resource.
However, if your hub doesn't show a green status light for one
or more computers, or when you start Windows it reports a problem
with the network adapter at startup, you can probably resolve the
problem by adjusting hardware settings.
In Windows 95/98:
- Open the System control panel and click the Device Manager
tab.
- Examine the Device Manager entry for Network Adapter. (If there's
a + sign in front of the entry, click it to expand the tree to
show the icon for the adapter itself.) A yellow exclamation point
next to the listing for your adapter indicates a conflict with
some other hardware device (see Chapter 8, Figure 4).
- Select the network adapter in the device list and click the
Properties button at the bottom of the window.
- Select the Resources Tab in the Network Properties window and
inspect the settings for "Interrupt Request" and "Input/Output
Range." If conflicts are reported under "Conflicting device list,"
you can reassign either of these values on this screen.
- If you don't find an entry for your network adapter in the
Device Manager list, close this window. You can ask Windows to
redetect your adapter by selecting the Control Panel/Add New Hardware
applet. Choose the option that asks Windows to perform an automatic
search. If the network adapter still isn't detected, shut down
the computer, open the case, and make sure the card is properly
inserted in its motherboard slot.
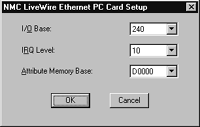
In Windows NT. Troubleshoot network error messages by examining
reports in the Event Log (log on as an administrator and choose
Programs/ Administrative Tools (Common)/Event Viewer). To change
the network adapter's configuration, open the Network control panel,
click the Adapters tab, right-click the adapter icon, and choose
Properties (see Figure 5).
|
Figure 5
..............................
Windows NT 4.0 network card settings |
|
|
Other troubleshooting techniques. If the foregoing procedures
don't eliminate the error messages, turn on the green lights, and
make Network Neighborhood appear on the Windows desktop, you may
need to change the settings on the board itself.
Newer ISA and PCI network adapters generally let you change their
settings using software, but unfortunately that software may have
to run in DOS mode. You can switch to DOS mode in Windows 95 or
98 by choosing Shut Down from the Start menu, checking Restart in
MS-DOS Mode, and clicking OK. If you're running Windows NT and your
PC's not set up to dual-boot to Windows 95/98 or DOS, you can get
to DOS mode by booting from a floppy. (See Appendix A: DOS Survival
Guide for help dealing with DOS.) Once you're at the DOS prompt,
run your network card setup/diagnostics program. This may show that
the card is preset to use IRQ 5 and port address 0300, where the
Windows Device Manager showed only IRQ10 and port address 0240 as
available resources. You can generally use the DOS configuration
software to change the presets of the network card to something
that will make Windows happy.
With older ISA adapters, if there's no software you'll probably
need to shut off the computer, open the case, and change a jumper
on the card (see Chapter 8, Figure 11).
If Windows seems to think your network adapter is working properly,
but the status light on the hub is not green, this may mean that
your adapter is configured for an inappropriate cable type. For
instance, you may have a 10BaseT network, but the adapter may be
set for Coax/ThinNet. Generally, this setting can be corrected by
running the configuration software that came with the card.
In rare circumstances, you may have to install an adapter manually
in Windows 95/98. The process is similar to the one described for
Windows NT, except that the Add button is on the Configuration tab.
Test
the Network
If the status
lights on your hub indicate network hardware is configured properly,
you can confirm whether Windows 95/98 or Windows NT 4.0 Workstation
has properly configured software settings with the following procedure:
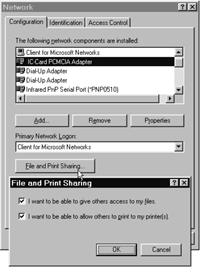
- Pick one computer on the network to be a test server. On that
PC, right-click Network Neighborhood and choose Properties. In
Windows 95/98, make sure File and Print Sharing are installed
by clicking the File and Print Sharing button (see Figure 6);
in Windows NT 4.0, make sure the Server component is installed
in the Services list. Choose the Identification tab and verify
or assign a Workgroup name (normally "workgroup"). If you're modifying
or installing these services for the first time, you'll be prompted
to restart the computer.
|
Figure 6
..............................
Installing file and print sharing. |
|
|
- After the computer restarts, test if the network's working
by sharing a folder as described in "To Share a Folder or Drive"
in the next section.
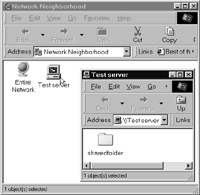
- Double-click the Network Neighborhood icon on the test server's
desktop, and you should see an icon for the computer you're working
on (since it is now a server). Double-click the computer's icon,
and you should see the folder you shared (see Figure 7).
|
Figure 7
..............................
Checking for the test server in Network Neighborhood.
|
|
|
- Go around to the other PCs on your network and repeat step
3 on each. If the test server and shared folder appears on all
of them, congratulations: your network is up and running.
If you don't see the test server listing in one or more of the
Network Neighborhoods on the other workstations, make sure that
they all have the same name in the Workgroup field of the Identification
tab of the Network control panel (the dialog you get when you right-click
Network Neighborhood and choose Properties).
|
|
BACK TO TOP | COMPLETE PDF GUIDE
|
|